With the new cursor as defined in the previous poss about tree cursors we can take the next step towards making a Purely Functional Semantic Forests Editor like Smos. In this post we will write a simple purely functional tree editor using brick, building on the previous simple text editor: nanosmos.
From a text editor to a tree editor
The semantic difference between a text editor and a tree editor is larger than the difference between a single-line text editor and a multi-line text editor. For the purposes of this blogpost, we will work with a tree of single-line text nodes, but you could do this with other types of nodes as well. (Smos does exactly that.)
Instead of using the original code for nanosmos and modifying it, we will start over. We won't start over from scratch however, but from the tui-base from my lecture about building TUIs using brick.
Our tree editor will look a bit like this:
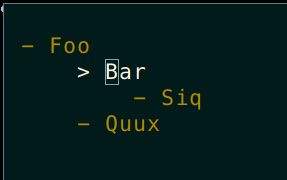
Here, you can see:
A single root node (remember, this is a tree editor, not a forest editor.)
Children below that, from top to bottom
One selected node, denoted with
>instead of-and also using color.
In this particular tree cursor, we will draw inspiration from vim, and have two modes. One mode in which the user edits the text of the currently selected node, and another node in which the user can move around in the tree and edit the tree.
Filling in the blanks
To make our simple TUI application, we need three pieces:
A way to draw the state
A way to style the drawing
A way to handle a keypress
Defining the state
The state of this TUI comprises of two pieces, the tree cursor and the mode.
data State =
  State
    { stateCursor :: TreeCursor TextCursor Text
    , stateMode :: Mode
    }
  deriving (Show, Eq)

data Mode
  = EditTree
  | EditText
  deriving (Show, Eq)
Note that the tree cursor is of type TreeCursor TextCursor Text. This means that the selected node is of type TextCursor and the other nodes are of type Text. This allows us to deal with cursors within cursors, in this case a TextCursor within a TreeCursor and it will become important later on.
Drawing the state
Next, we need a way to draw any given state. This is where it becomes important to know what a tree cursor looks like on the inside. Recall that in the blogpost on tree cursors we discussed what a tree cursor could look like. In the particular case of this blogpost, we will use the cursor library, so our tree cursor will look as follows:
-- In our case, 'a' is a 'TextCursor' and 'b' is a 'Text'
data TreeCursor a b = TreeCursor
    { treeAbove :: !(Maybe (TreeAbove b)) -- The nodes above the currently selected node
    , treeCurrent :: !a -- The currently selected node
    , treeBelow :: !(CForest b) The nodes below the currently selected node
    } deriving (Show, Eq, Generic)

data TreeAbove b = TreeAbove
    { treeAboveLefts :: ![CTree b] -- In reverse order
    , treeAboveAbove :: !(Maybe (TreeAbove b))
    , treeAboveNode :: !b
    , treeAboveRights :: ![CTree b]
    } deriving (Show, Eq, Generic, Functor)
The cursor library uses the CTree and CForest types to allow you to collapse and un-collapse trees. They are defined as follows but the collapsing functionality is left as an exercise for the reader. We just need to know how to pattern-match on them in what follows.
-- | A CTree is a 'Collapsable' tree.
--
-- It allows the nodes below to be hidden.
data CTree a =
    CNode !a
          !(CForest a)
    deriving (Show, Eq, Generic, Functor)

-- | A CForest is a 'Collapsable' forest.
--
-- It is either empty, or closed, or open
data CForest a
    = EmptyCForest
    | ClosedForest !(NonEmpty (Tree a))
    | OpenForest !(NonEmpty (CTree a))
    deriving (Show, Eq, Generic, Functor)
Drawing a tree cursor is now fairly straight-forward, if somewhat complicated. For the current node and its forest below, it is easy-ish to make a widget. To extend this widget to contain the entire tree, however, is a tad more complicated. We will use a helper function as follows:
    drawTreeCursor ::
         forall a b n.
         ([CTree b] -> b -> [CTree b] -> Widget n -> Widget n) -- ^ A way to wrap the widget from above
      -> (a -> CForest b -> Widget n) -- ^ A way to draw the current subtree
      -> TreeCursor a b
      -> Widget n
    drawTreeCursor wrapAboveFunc currentFunc TreeCursor {..} =
      wrapAbove treeAbove $ currentFunc treeCurrent treeBelow
      where
        wrapAbove :: Maybe (TreeAbove b) -> Widget n -> Widget n
        wrapAbove Nothing = id
        wrapAbove (Just ta) = goAbove ta
        goAbove :: TreeAbove b -> Widget n -> Widget n
        goAbove TreeAbove {..} =
          wrapAbove treeAboveAbove .
          wrapAboveFunc (reverse treeAboveLefts) treeAboveNode treeAboveRights
Now all we need are two things to draw:
A way to draw a sub tree.
    cur :: TextCursor -> CForest Text -> Widget ResourceName
    cur tc cf =
      let ecw = withAttr selectedAttr $ (str "> " <+>) $ drawTextCursor tc
          rest = padLeft defaultPadding $ drawCForest cf
       in vBox [ecw, rest]
A way to wrap the resulting widget if the selected node is not the root node.
    wrap :: [CTree Text] -> Text -> [CTree Text] -> Widget n -> Widget n
    wrap tsl e tsr w =
      let befores = map drawTextCTree tsl
          ew = txt e
          afters = map drawTextCTree tsr
       in (str "- " <+> ew) <=> padLeft defaultPadding (vBox $ concat [befores, [w], afters])
A few functions are left out here for brevity:
drawTextCursor :: TextCursor -> Widget ResourceNamedrawCForest :: CForest Text -> Widget ndrawTextCTree :: CTree Text -> Widget ndefaultPadding :: Padding
The remaining pieces of the drawing function are relatively straight-forward and they are left as an exercise to the reader.
Dealing with user input
Brick requires a function of the following type:
handleEvent :: State -> BrickEvent n e -> EventM n (Next State)To define this function, we start with a few helper functions in a let clause:
    let textDo :: (TextCursor -> Maybe TextCursor) -> (EventM n (Next State))
        textDo func = mDo $ treeCursorCurrentL func
        mDo ::
             (TreeCursor TextCursor Text -> Maybe (TreeCursor TextCursor Text))
          -> (EventM n (Next State))
        mDo func =
          let tc = stateCursor s
              tc' = fromMaybe tc $ func tc
           in continue $ s {stateCursor = tc'}
    in ...
These helper functions allow us to piece together the functions from the cursor library into a concise event handler. Indeed, our event handler can now look like this:
case stateMode s of
  EditText ->
    let switchMode = continue $ s {stateMode = EditTree}
     in case key of
          KChar c -> textDo $ textCursorInsert c
          KBS -> textDo textCursorRemove
          KDel -> textDo textCursorDelete
          KLeft -> textDo textCursorSelectPrev
          KRight -> textDo textCursorSelectNext
          KEsc -> switchMode
          _ -> continue s
The above is only the case when the mode is EditText. Any typable character is inserted as-is, and the normal left, right, backspace and delete functionality is taken straight from the Cursor.Text module. The next snippet is the case when the mode is EditTree:
  EditTree ->
    let switchMode = continue $ s {stateMode = EditText}
     in case key of
          KChar 'i' -> switchMode
          KChar 'j' -> mDo $ treeCursorAppend (Node "" [])
          KChar 'J' -> mDo $ Just . treeCursorAddChildAtStart (Node "" [])
          KChar 'd' ->
            mDo $ \tc ->
              case treeCursorRemoveElem toTextCursor tc of
                Deleted -> Nothing
                Updated tc' -> Just tc'
          KChar 'D' ->
            mDo $ \tc ->
              case treeCursorRemoveSubTree toTextCursor tc of
                Deleted -> Nothing
                Updated tc' -> Just tc'
          KUp -> mDo $ treeCursorSelectPrev toText toTextCursor
          KDown -> mDo $ treeCursorSelectNext toText toTextCursor
          KEsc -> halt s
          _ -> continue s
These pieces are taken from the Cursor.Tree module. Note that some functions expect these two conversion functions:
toTextCursor :: Text -> TextCursor
toTextCursor = fromMaybe (error "Wasn't a single line") . makeTextCursor

toText :: TextCursor -> Text
toText = rebuildTextCursor
This is because moving around in the tree cursor requires converting unselected Text nodes to selected TextCursor nodes and back. If you are worried that toTextCursor is partial: You can solve this problem with a Validity constraint on State, but that is left as an exercise to the reader.
Styling
The last piece of the puzzle involves coloring in our neat little tree editor. All we need to do is annotate widgets with withAttr using an AttrName of our choosing, and then defining the AttrMap to style those attributes. I chose the following:
  attrMap
    Vty.defAttr
    [ (nodeAttr, fg yellow)
    , (selectedAttr, fg brightWhite)
    , (modeAttr, fg green)
    , (infoAttr, fg blue)
    , (warningAttr, fg red)
    ]

nodeAttr, selectedAttr, modeAttr, infoAttr, warningAttr :: AttrName
nodeAttr = "node"
selectedAttr = "selected"
modeAttr = "mode"
infoAttr = "info"
warningAttr = "warning"
This makes the result look quite neat:
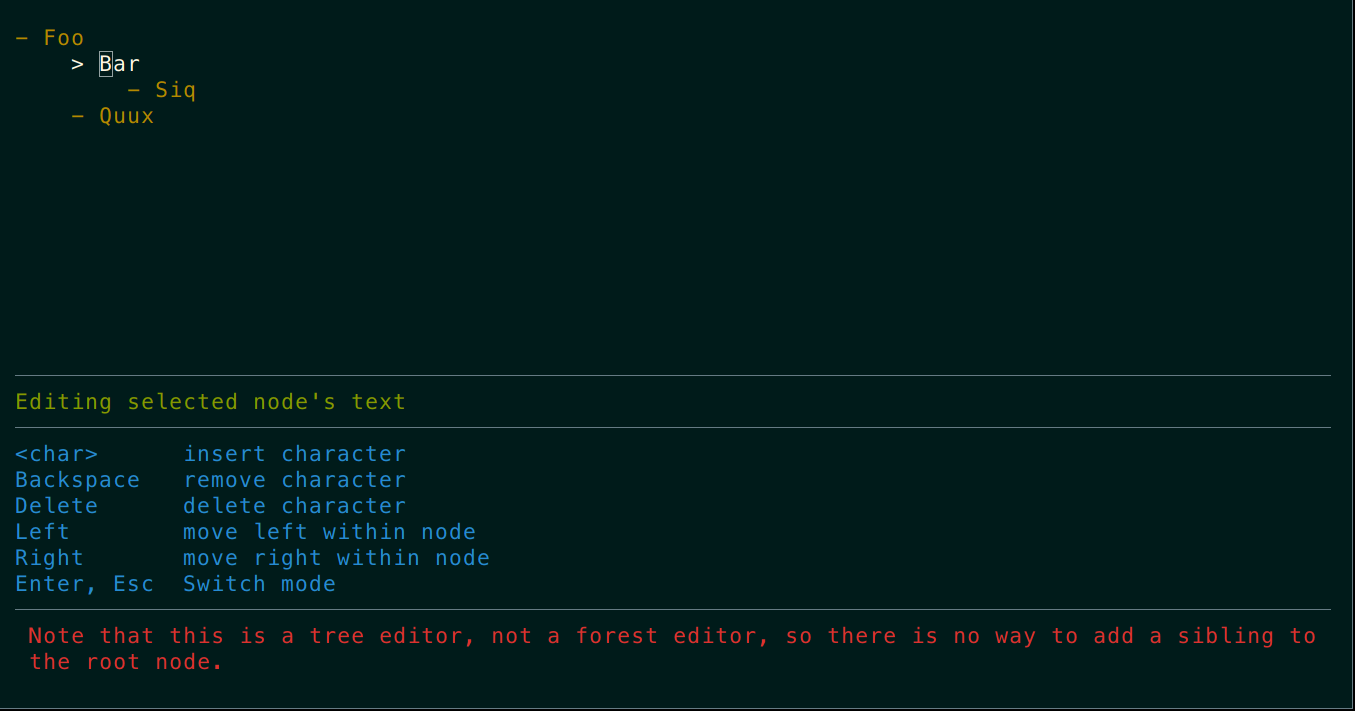
There we have it: A purely functional semantic tree editor in fewer than 300 lines of code.
References
The full code can be found on github. Text cursors are available in the cursor package on Hackage. This post is part of an effort to encourage contributions to Smos. The simplest contribution could be to just try Smos out and provide feedback on the experience. Smos is a purely functional semantic editor of a subset of YAML that is intended to replace Emacs' Org-mode for Getting Things Done.